If you're looking to bring some festive cheer to your holiday gatherings, the Santa Cheese Board - How to Make the Ultimate Christmas Party Appetizer Recipe is exactly what you need. It's a fun, visually delightful way to serve cheese and snacks that instantly become the centerpiece of any Christmas party. Whether it's a cozy family night or a lively holiday bash, this board brings out smiles and starts conversations - and trust me, everyone loves nibbling on a Santa-shaped snack spread!

Jump to:
Why This Recipe Works
This cheese board isn't just about looking festive - it's a thoughtful layering of flavors and textures that balance creamy, savory, and slightly spicy elements into one stunning presentation. Plus, it's surprisingly simple to pull together without heavy cooking or fuss.
- Consistent Texture: Cubed and sliced cheeses provide comfortable bite sizes that are easy to enjoy and arrange.
- Deep, Balanced Flavor: Combining mild Colby Jack with sharp white cheddar and salty pepperoni creates festive flavor contrasts.
- Simple Ingredients: All you need are standard cheeses, pepperoni, olives, and a variety of crackers - no specialty items required.
- Fast Prep, Big Payoff: With about 25 minutes of prep, you've got a stunning centerpiece that's ready to go before the guests arrive.
Ingredient Game Plan

When gathering ingredients for this Santa Cheese Board - How to Make the Ultimate Christmas Party Appetizer Recipe, I recommend picking cheeses that hold their shape well but still melt smoothly in your mouth. I usually visit my local deli to get fresh, cut-to-order slices and cubes - the freshness really makes a difference.
- Colby Jack Cheese: Choose a semi-firm block with a nice orange-white marbling for Santa's face.
- White Cheddar Cheese: Go for a sharp, aged variety for some tang and character in the hat and beard.
- Provolone and Mozzarella Slices: Opt for thin slices that are easy to mold and layer.
- Swiss Cheese Slices: Its mild nutty flavor and pale color add warmth to facial details.
- Pepperoni Slices: Select thin slices with good color and a little spice - they shape the hat and some facial accents perfectly.
- Black Olives: Look for large, glossy olives for Santa's eyes.
- Assorted Crackers: Include a variety like grainy, buttery, artisan, and baguette slices for crunchy balance.
Quick Note: Exact measurements are in the printable recipe card at the bottom.
How to Cook Santa Cheese Board - How to Make the Ultimate Christmas Party Appetizer Recipe
Step 1 - Prep & Season
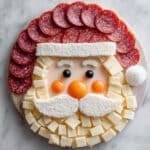
Start by cubing your Colby Jack and white cheddar cheeses into bite-sized pieces - about ¾-inch cubes work perfectly. Lay the Colby Jack cubes flat on your serving board in a rough oval shape to create Santa's friendly face. You'll notice the bright orange color already feels warm and inviting. No seasoning is necessary here, but make sure the cheese is at room temperature for best texture and flavor release.
Step 2 - Build Flavor
Reserve the white cheddar cubes for Santa's hat base. Arrange them above the face area, stacking gently to form the bottom part of the hat. Next, layer your pepperoni slices to create the classic red hat shape. I like to overlap slices slightly so the spicy aroma unfolds naturally without crowding. Then add smaller white cheese slices as the hat's trim and pom-pom - these creamy whites really brighten the look and create contrast.
Step 3 - Finish for Best Texture
Use slices of provolone, mozzarella, and Swiss cheese to build out Santa's beard and facial features like the mustache, eyebrows, cheeks, mouth, and nose. It's easiest if you fold or roll slices slightly to create curves. Add black olive slices for eyes - they give Santa that playful sparkle. Finally, fill in empty spots with an array of crackers, creating a crunchy frame that balances the soft cheeses beautifully. Keep the board chilled until serving to preserve texture.
Pro Moves I Swear By
Over the years, I've learned a few tricks to make this Santa Cheese Board - How to Make the Ultimate Christmas Party Appetizer Recipe look flawless every time, with minimal stress.
- Doneness Cue: No cooking here, but make sure cheeses are not too cold - that makes them stiff and harder to shape.
- Temperature Trick: Let cheeses rest 15 minutes at room temperature before assembling to unlock their fullest flavor.
- Make-Ahead Move: Prep all components the day before and assemble the board just before guests arrive to keep everything fresh.
- Skip This Pitfall: Avoid overcrowding the board; give each element room to breathe so it shines visually and texturally.
Serve It Up

Finishing Touches
I love adding a scattering of fresh herbs like rosemary or pine sprigs around the edges for that festive green pop - it pairs beautifully with the rustic crackers and Santa's red hat. A small bowl of honey mustard or berry preserves nearby also gives guests a sweet-savory option to try with their cheese bites, elevating the board even more.
Great Pairings
To balance out the rich cheese and cured meats, I usually include crisp apple slices or fresh pear wedges alongside the crackers. A handful of roasted nuts or a few pickles add interesting textures and layers. Plus, sparkling water or a chilled white wine complements the savory flavors perfectly.
Easy Plating Wins
For a casual party, I keep the board simple and rustic - wooden boards and natural elements like fresh rosemary spruce it up without fuss. For a more formal holiday event, white ceramic platters allow the colors of the cheeses and pepperoni to really pop. Just don't hesitate to get playful with shapes and spacing; it adds charm and invites guests to dig in.
Make-Ahead & Storage
Storing Leftovers
Place leftovers in an airtight container or wrap the board tightly with plastic wrap to prevent drying out. Stored in the fridge, the board components will stay fresh for up to 3 days, but cheese texture and flavor are best enjoyed within 24 hours.
Freezer Notes
I don't recommend freezing this cheese board once assembled because fresh crackers can become soggy and the delicate cheeses lose their best texture. If you want to save ingredients, freeze the cheeses separately before assembling.
Reheating Santa Cheese Board - How to Make the Ultimate Christmas Party Appetizer Recipe Without Drying Out
This appetizer is best enjoyed cold or at room temperature, so reheating isn't necessary. If you do prefer warm bites, try briefly warming pepperoni slices in a skillet separately, then return to the board. Otherwise, warming cheeses risks drying them out or losing their signature textures.
Frequently Asked Questions
Absolutely! Feel free to use your favorite cheeses as long as they're firm enough to hold shape. Gouda, havarti, or even a tangy blue cheese can add exciting flavors and textures.
You can prep all ingredients a day in advance, but assemble the board the same day or just before serving to keep everything fresh and vibrant.
Serve crackers separately or add them last when guests arrive. Avoid placing crackers directly under moist cheeses or olives to maintain crispness.
While this classic recipe relies on dairy cheeses, you can substitute plant-based cheese alternatives and vegan pepperoni slices to suit your dietary needs. Just keep in mind texture may vary slightly.
Final Thoughts
PrintComplete Recipe
Santa Cheese Board - How to Make the Ultimate Christmas Party Appetizer Recipe
Create a festive and delicious Santa Cheese Board perfect for Christmas parties, featuring a whimsical arrangement of assorted cheeses, pepperoni, olives, and crackers shaped like Santa Claus's face and hat.
- Prep Time: 25 minutes
- Cook Time: 0 minutes
- Total Time: 25 minutes
- Yield: 8 servings
- Category: Appetizer
- Method: No-Cook
- Cuisine: American
Ingredients
Cheeses
- 1 cup Colby Jack cheese, cubed
- 1 cup White Cheddar cheese, cubed
- 6 slices Provolone cheese
- 6 slices Mozzarella cheese
- 6 slices Swiss cheese
Meats & Garnishes
- 20 slices Pepperoni
- 10 Black olives, sliced
Crackers
- Assorted crackers (grain, butter, artisan, baguette) - 2 cups
Instructions
- Arrange Santa's Face: Begin by placing the cubed Colby Jack cheese in the shape of Santa's face on a large serving board to create a base.
- Create the Hat Base: Add a layer of white cheddar cheese cubes above the face to form the base of Santa's hat.
- Build the Hat: Layer pepperoni slices on top of the white cheddar layer to fill out Santa's red hat.
- Add White Hat Trim: Use white cheddar and mozzarella slices to create the white trim and pom-pom on the hat.
- Form the Beard: Build Santa's beard by arranging white cheddar, mozzarella, and Swiss cheese slices beneath the face area in a flowing shape.
- Shape Facial Features: Use small pieces of cheese and pepperoni to craft the mustache, eyebrows, cheeks, mouth, and nose.
- Add Santa's Eyes: Place sliced black olives strategically to form Santa's eyes, giving the cheese board life and character.
- Fill in Gaps: Use assorted crackers and any remaining garnishes to fill gaps and enhance the overall presentation.
- Serve or Store: Serve the cheese board immediately, or cover and refrigerate until ready to serve.
Notes
- Use a variety of cheeses with different textures and colors for visual interest and taste.
- Adjust the quantity of ingredients based on the number of guests.
- Keep the cheese board refrigerated if not serving immediately to maintain freshness.
- Substitute pepperoni with other sliced cured meats if preferred.
- Feel free to add festive garnishes like fresh herbs or nuts for extra flavor and decoration.


Leave a Reply