If you're looking for a dessert that feels like a warm hug and a little indulgence all wrapped into one, this Rich Chocolate Peanut Butter Cake Recipe is an absolute winner. Perfect for weekend treats or special occasions, it combines the deep, silky flavors of chocolate with the creamy, nutty richness of peanut butter. I love making this when I want to impress guests or just spoil myself-it's that kind of cake that's both comforting and decadent without being complicated.

Jump to:
Why This Recipe Works
This Rich Chocolate Peanut Butter Cake Recipe strikes the perfect balance between indulgent flavors and straightforward technique. You get a luscious, creamy filling that's punctuated by melty chocolate chips and a crunchy cookie crust, all crowned with a glossy ganache that's just heavenly.
- Consistent Texture: The cream cheese and peanut butter blend creates a velvety, smooth filling that holds its shape beautifully.
- Deep, Balanced Flavor: Chocolate chips in the batter and a rich ganache top give layers of chocolate contrasted by nutty peanut butter.
- Simple Ingredients: You only need everyday pantry staples, making this recipe accessible and fuss-free.
- Fast Prep, Big Payoff: Most of your time is hands-off baking and chilling, which makes this recipe stress-free yet impressive.
Ingredient Game Plan

Getting the right ingredients is key to nailing the flavors and textures in this Rich Chocolate Peanut Butter Cake Recipe. I always recommend using high-quality cream cheese and fresh peanut butter for that true richness you'll notice with every bite.
- Oreo crumbs: Use original Oreos for that perfect chocolate cookie crust; the cream filling adds a subtle sweetness.
- Unsalted butter: Melted and added to the crust to bind crumbs nicely without overpowering flavor.
- Cream cheese: Soften it at room temperature to ensure a smooth, lump-free filling.
- Smooth peanut butter: Adds creaminess and depth-no crunchy varieties here to keep texture balanced.
- Miniature chocolate chips: These disperse evenly, giving little bursts of chocolate in every slice.
- Milk chocolate chips or chopped milk chocolate: For the ganache, provide a silky finish and glossy shine.
- Chopped Reese's cups and crushed peanuts: Sprinkled on top for extra texture and the ultimate peanut butter-chocolate harmony.
Quick Note: Exact measurements are in the printable recipe card at the bottom.
How to Cook Rich Chocolate Peanut Butter Cake Recipe
Step 1 - Prep & Season
Start by combining the Oreo crumbs with melted butter. You'll want to press this mixture firmly and evenly into the bottom of your 9-inch springform pan. This crust sets the foundation, so make sure it's packed tight and smooth-no gaps. Then pop it in the freezer for 10 to 15 minutes; chilling it first helps the crust hold its shape when the creamy filling goes in.
Step 2 - Build Flavor
Next, beat the softened cream cheese until it's silky smooth. This step really determines the texture, so no lumps here! Gradually add sugar, beating until the mixture feels light and fluffy; this is where your patience pays off. Add your eggs one at a time-it helps to incorporate air and prevents curdling. Stir in the peanut butter and vanilla extract, then gently fold in the heavy cream. You'll notice the batter becomes rich but still creamy, almost pillowy.
Step 3 - Finish for Best Texture
Fold in those miniature chocolate chips carefully so they're evenly distributed without deflating your batter. Pour the filling over the chilled crust and bake at 325°F (160°C) for about 60 to 75 minutes. You're aiming for edges that are fully set with a center that still has a slight jiggle-it might feel delicate, but it firms up as it cools. After baking, cool the cake in the oven with the door slightly ajar for one hour to prevent cracking, then finish cooling at room temperature before refrigerating it for at least six hours or overnight. The patience here rewards you with a silky, stable texture.
Pro Moves I Swear By
Over the years, I've learned these tips make the Rich Chocolate Peanut Butter Cake Recipe come together flawlessly every time. These small details boost texture and flavor, and they help you avoid common baking woes.
- Doneness Cue: Look for a cake center that jiggles slightly like gelatin, not liquidy. It will set perfectly in the fridge.
- Temperature Trick: Always use room-temperature eggs and cream cheese to get a smooth batter without clumps.
- Make-Ahead Move: Bake this a day ahead to give it enough chill time. It makes slicing cleaner and flavors richer.
- Skip This Pitfall: Don't overmix after adding your eggs to keep your cake light, not dense or heavy.
Serve It Up

Finishing Touches
Once chilled and set, gently remove the sides of the springform pan. Now, pour the warm, silky milk chocolate ganache over the top, watching it drip artfully down the edges. I like to sprinkle chopped Reese's cups and crushed roasted peanuts right away while the ganache is still soft-that contrast of textures and that extra peanut butter hit truly elevate this cake.
Great Pairings
This cake loves company. Pair it with a simple scoop of vanilla bean ice cream to balance the richness and add creaminess. If you want a fresh contrast, raspberries or a lightly sweetened whipped cream work wonderfully as well.
Easy Plating Wins
For casual dinners, serve slices on simple plates with a few whole peanuts or mini chocolate chips scattered around. For special occasions, drizzle a little extra ganache on the plate and add a sprig of mint or edible flower for a beautiful touch that's surprisingly easy.
Make-Ahead & Storage
Storing Leftovers
Store any leftover cake in an airtight container in the fridge for up to 4 days. The cake tends to soften and the ganache sets firmer overnight, which actually enhances the texture and flavor depth.
Freezer Notes
This Rich Chocolate Peanut Butter Cake Recipe freezes well-just wrap it tightly in plastic wrap and foil, then freeze for up to 2 months. Thaw overnight in the fridge for best texture; ganache might firm up, but it'll soften quickly at room temperature.
Reheating Rich Chocolate Peanut Butter Cake Recipe Without Drying Out
If you want to warm slices gently, the microwave on low power for 10-15 seconds usually suffices-watch it closely. Alternatively, heat in a 300°F oven wrapped loosely in foil for 10 minutes. Avoid overheating to keep the creamy texture intact without drying out the cake.
Frequently Asked Questions
You can, but smooth peanut butter gives the filling a creamier texture. Crunchy might add texture but could affect the smoothness of your cake.
Cooling it slowly in the oven with the door slightly open after baking helps prevent cracks. Also, avoid overbaking and overmixing your batter.
Swap the Oreo crumbs with a gluten-free chocolate cookie crumb of similar texture. Just ensure all other ingredients, like peanut butter and chocolate, are gluten-free.
Absolutely! The recipe is straightforward and forgiving, perfect if you're new to baking cheesecakes but want something impressive.
Final Thoughts
I hope you enjoy making and sharing this Rich Chocolate Peanut Butter Cake Recipe as much as I do. It feels fancy but comes together without fuss, perfect for treating yourself any time. Remember, the secret is in the patience: chilling between steps makes everything come together beautifully. Once you've had one slice, I bet you'll find yourself wanting to make it again sooner than you expected.
PrintComplete Recipe
Rich Chocolate Peanut Butter Cake Recipe
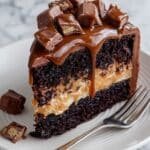
This Rich Chocolate Peanut Butter Cake is a decadent cheesecake featuring an Oreo crust, creamy peanut butter and cream cheese filling studded with chocolate chips, and a luscious milk chocolate ganache topping sprinkled with Reese's cups and roasted peanuts. Perfect for chocolate and peanut butter lovers looking for an indulgent dessert.
- Prep Time: 30 minutes
- Cook Time: 75 minutes
- Total Time: 7 hours 45 minutes
- Yield: 12 servings
- Category: Dessert
- Method: Baking
- Cuisine: American
Ingredients
Crust
- 2 cups Oreo crumbs
- ¼ cup unsalted butter, melted
Filling
- 32 oz cream cheese, softened
- 1 ⅓ cups sugar
- 4 large eggs
- 1 cup smooth peanut butter
- 2 teaspoon vanilla extract
- ⅓ cup heavy cream
- 1 ¼ cups miniature chocolate chips
Ganache and Topping
- ½ cup heavy cream
- 1 ½ cups milk chocolate chips or 9.5 oz milk chocolate, finely chopped
- Chopped Reese's cups
- Crushed roasted peanuts
Instructions
- Prepare the crust: Combine Oreo crumbs and melted butter thoroughly. Press the mixture evenly into the bottom of a 9-inch springform pan. Place the crust in the freezer for 15 minutes to set.
- Make the filling: Beat the softened cream cheese until smooth. Gradually add sugar and continue beating until the mixture is light and fluffy. Add eggs one at a time, beating well after each addition. Stir in the smooth peanut butter and vanilla extract until combined. Gently fold in ⅓ cup heavy cream until incorporated.
- Add chocolate chips: Carefully fold 1 ¼ cups miniature chocolate chips into the cream cheese mixture, ensuring even distribution without overmixing.
- Bake the cake: Pour the filling evenly over the chilled crust in the springform pan. Bake in a preheated oven at 325°F (160°C) for 75 minutes, or until the edges are set and the center is slightly jiggly. After baking, cool in the oven with the door slightly open for 1 hour, then cool completely at room temperature. Finally, refrigerate for at least 6 hours or overnight to set fully.
- Prepare ganache: Heat the milk chocolate chips or chopped milk chocolate with ½ cup heavy cream using a double boiler or microwave until fully melted and smooth. Let the ganache cool slightly to thicken.
- Assemble the cake: Remove the sides of the springform pan carefully once the cheesecake is fully set. Pour the ganache over the top of the cake, allowing it to drip down the sides. Garnish generously with chopped Reese's cups and crushed roasted peanuts. Refrigerate briefly if needed before serving.
Notes
- Use full-fat cream cheese and peanut butter for the richest flavor and smoothest texture.
- Freezing the crust before adding the filling helps prevent sogginess.
- Allow the cheesecake to cool gradually to avoid cracks on the surface.
- If you don't have miniature chocolate chips, chop regular chocolate into small pieces as a substitute.
- For easier ganache melting, chop the milk chocolate finely to ensure smooth consistency.
- Store leftovers covered in the refrigerator for up to 3 days to maintain freshness.


Leave a Reply