When you take a bite of this Red Velvet Cheesecake Brownies Recipe, you're greeted with that deep, rich red velvet flavor melting into a creamy cheesecake swirl. It's a dreamy combo of tender, fudgy brownie with a luxuriously smooth cheesecake layer, all topped off with a playful sparkle of red sugar crystals. Perfect for cozy weekend baking or special occasions, this treat always fills the kitchen with that warm, inviting aroma that gets everyone excited.

Jump to:
- The Cozy Reasons You'll Make Red Velvet Cheesecake Brownies Recipe Again
- Ingredients You'll Actually Use
- How to Make Red Velvet Cheesecake Brownies Recipe Without Stress
- Little Tricks That Make Red Velvet Cheesecake Brownies Recipe Better
- Serving Ideas That Look Great
- Storing & Reheating Red Velvet Cheesecake Brownies Recipe
- Red Velvet Cheesecake Brownies Recipe FAQs
- You Made It - Now Tell Me!
- Complete Recipe
The Cozy Reasons You'll Make Red Velvet Cheesecake Brownies Recipe Again
This recipe hits that sweet spot between indulgence and simplicity. It's bright, festive, and surprisingly straightforward to make-even if you're juggling a busy schedule. The cheesecake topping adds a lush, creamy contrast that makes these brownies feel extra special, whether for a casual coffee date or a dessert centerpiece. Trust me, once you take a bite, you'll want to make it for all your celebrations and quiet nights alike.
- Big flavor, simple steps: You'll love how easy it is to mix up both batters without raising a sweat, yet the taste is impressively rich.
- Comfort-food energy: The warm chocolate and tangy cheesecake pair perfectly to soothe and satisfy sweet cravings, any time of day.
- Everyday ingredients: No fancy or hard-to-find items here-just pantry staples with a splash of red food coloring for that signature look.
- Easy to customize: Play with toppings or mix-ins to suit your mood, whether it's a little extra crunch or a hint of spice.
Ingredients You'll Actually Use

Let's talk about choosing and prepping your ingredients for this Red Velvet Cheesecake Brownies Recipe. The quality of your butter and cream cheese really shows through, so I always recommend using unsalted butter (Kerrygold is my go-to) and cream cheese that's room temperature for that perfect silky batter. If you want to skip the red food coloring, you can try beet puree for natural color, though it's a bit more subtle. Also, Greek yogurt is essential for adding creamy moisture to the cheesecake layer, but sour cream works well if you prefer a tangier note.
- Red Velvet Base: Use good-quality semi-sweet chocolate finely chopped for smooth melting; swaps like dark chocolate add depth.
- Flavor Builders: Vanilla extract and a pinch of salt enhance sweetness and balance richness-don't skip them!
- Texture Helpers: Greek yogurt keeps the cheesecake layer creamy without extra heaviness, while dark brown sugar adds warmth and chewiness to the brownie.
- Optional Add-Ins: Try a sprinkle of cinnamon or espresso powder in the batter for some subtle complexity, or toss in chocolate chips for extra melty pockets.
Ingredient Note: Exact measurements for Red Velvet Cheesecake Brownies Recipe are listed in the printable recipe card at the bottom of the post.
How to Make Red Velvet Cheesecake Brownies Recipe Without Stress

Step 1 - Set Up for Success
First things first, preheat your oven to 350°F (175°C). A well-prepared pan makes all the difference: I recommend generously greasing a 9-inch round springform pan with butter or shortening-this helps the brownies release beautifully later. While the oven's warming and your pan's ready, gather and prep your ingredients (chopped chocolate, softened cream cheese, measured sugars). Having everything within arm's reach always makes the process smoother and more enjoyable.
Step 2 - Cook Red Velvet Cheesecake Brownies Recipe Until It Smells Amazing
Fill a small pot halfway with water and bring it to a gentle boil for a double boiler setup. In a bowl, whisk together flour, baking powder, and salt. Then, in a heatproof bowl over the simmering water, melt your butter and finely chopped chocolate together. Stir slowly with a rubber spatula until glossy and smooth-you'll notice that rich chocolate aroma filling your kitchen. Take the bowl off the heat to cool slightly before whisking in dark brown sugar, the eggs, and vibrant red food coloring. Finally, fold in your dry ingredients just until smooth and silky. Set this batter aside because now is cheesecake time.
Step 3 - Finish Strong
In your stand mixer (or with a hand mixer), beat softened cream cheese and Greek yogurt until creamy and fluffy-this is the secret to that dreamy texture. Add sugar and vanilla, then eggs one at a time, fully blending each. Mix in the final bit of flour until the cheesecake batter is smooth and cohesive. Now, pour nearly all of your red velvet brownie batter evenly into the prepared pan, smoothing it carefully. Layer the cheesecake batter on top, then drizzle the reserved ¼ cup of brownie batter over the surface. Use a butter knife to create pretty marbled swirls-no two slices will be the same! Bake for about 30 minutes until the edges are just golden and the cheesecake layer feels set but still a bit wobbly. Let cool for half an hour, then sprinkle generously with those festive red sugar crystals before chilling for 3+ hours to settle.
Little Tricks That Make Red Velvet Cheesecake Brownies Recipe Better
Over the years, I've learned a few secrets that help these brownies turn out perfect every time. The key is balancing doneness so the cheesecake is creamy, not dry; watching the edges for a gentle golden hue is your best bet. Keeping your heat steady avoids cracking or drying out the top, and if you want to prep ahead, these brownies freeze beautifully-just slice after baking and freeze in layers with parchment paper. If you find the cheesecake layer cracking, adding a splash of sour cream or yogurt helps maintain moisture. Lastly, a hot water rinse on your heart-shaped cookie cutter before cutting ensures clean, pretty shapes without crumbling.
- Doneness cues: The cheesecake should be set with a slight wobble in the center-overbaking makes it dry.
- Heat control: Bake at 350°F consistently without opening the door early to keep the layers intact.
- Make-ahead options: Chill overnight or freeze individual portions for up to 3 months.
- Common issues + fixes: If cracking occurs, mix in extra yogurt next time; use hot water on the cutter for smooth edges.
Serving Ideas That Look Great

Finishing Touches
To elevate your Red Velvet Cheesecake Brownies Recipe, I like to add a light dusting of powdered sugar or drizzle some warm white chocolate over the top for extra sweetness and shine. Fresh berries-like raspberries or strawberries-offer a bright, juicy contrast that's just delightful. For a little crunch, sprinkle toasted pecans or walnuts right before serving. If you want a subtle zing, a tiny sprinkle of flaky sea salt balances the sweetness beautifully.
Perfect Pairings
This dessert pairs beautifully with a scoop of vanilla bean ice cream or a dollop of whipped cream to complement the cheesecake richness. For drinks, a cup of strong coffee or a creamy chai latte really brings out the chocolate notes. If you're feeling adventurous, serve with a light salad of arugula, candied pecans, and a citrus vinaigrette for a fun sweet-savory combo that refreshes the palate between bites.
Make It Photo-Ready
When plating your heart-shaped brownies, use contrasting plates-bright white or soft pastel colors really make that red pop. Stack a few pieces to add height or layer them slightly angled for a casual café vibe. Keep edges clean by wiping your knife between cuts, and garnish with a mint leaf or few red sugar crystals scattered around for that extra sparkle that makes your guests say wow!
Storing & Reheating Red Velvet Cheesecake Brownies Recipe
Fridge Storage
Because of the creamy cheesecake layer, these brownies keep best in the refrigerator. Store them in an airtight container, ideally a single layer to preserve those gorgeous swirls. They stay fresh and satisfyingly moist for about 3 to 4 days-perfect for making ahead or enjoying as leftovers.
Freezing Tips
These brownies freeze fantastically! After baking and fully cooling, slice into portions and freeze in a single layer with parchment paper between each piece. When you're ready to enjoy, thaw in the fridge overnight to keep their creamy texture intact without sogginess.
Reheating Without Drying Out
Warm your brownies gently-either microwave for 15-20 seconds or bake in a preheated 300°F oven for 5-7 minutes. Cover with foil if reheating in the oven to prevent drying. Avoid overheating to keep that creamy cheesecake layer luscious and tender.
Red Velvet Cheesecake Brownies Recipe FAQs
Absolutely! You can substitute red food coloring with natural options like beet juice or powdered freeze-dried raspberries, though the color might be less vibrant. The flavor will still shine through perfectly.
To minimize cracks, be sure not to overmix the cheesecake batter and avoid overbaking. Also, adding a bit of Greek yogurt or sour cream keeps the cheesecake moist and reduces cracking.
Yes! Use a 1:1 gluten-free all-purpose flour blend in place of regular flour. This swap won't affect the texture much, and your brownies will stay tender and rich.
Use a metal heart-shaped cookie cutter warmed under hot water before cutting-this helps with smooth edges and prevents crumbly bits. Work on a clean, flat surface and cut carefully for the best results.
You Made It - Now Tell Me!
I can't wait to hear how your Red Velvet Cheesecake Brownies Recipe turns out! Please come back and leave a rating or comment with your favorite twists-maybe you added nuts, swapped in natural color, or found a perfect topping combo. Sharing your experience helps everyone bake with confidence. And don't forget to save or pin this post so you can whip up these luscious heart-shaped brownies whenever the craving hits. Happy baking, friend!
PrintComplete Recipe
Red Velvet Cheesecake Brownies Recipe
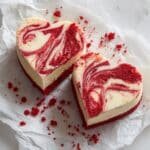
This Delicious Heart-Shaped Red Velvet Cheesecake combines rich red velvet brownie layers with a creamy cheesecake topping, swirled together to create a moist, visually stunning dessert perfect for romantic occasions or special gatherings.
- Prep Time: 20 minutes
- Cook Time: 30 minutes
- Total Time: 3 hours 50 minutes
- Yield: Approximately 20 heart-shaped brownies
- Category: Dessert
- Method: Baking
- Cuisine: American
- Diet: Vegetarian
Ingredients
Red Velvet Brownie Batter
- ½ cup all-purpose flour
- 4 oz semi-sweet chocolate, finely chopped
- 2 large eggs
- 1 fl oz red food coloring
- 5 tablespoon unsalted butter
- ½ cup packed dark brown sugar
- ¼ teaspoon baking powder
- ¼ teaspoon salt
Cheesecake Batter
- ⅔ cup granulated sugar
- 1 tablespoon all-purpose flour
- 8 oz softened cream cheese
- 1 tablespoon vanilla extract
- 2 large eggs
- ¼ cup plain Greek yogurt (full-fat)
Topping
- red sugar crystals
Instructions
- Preheat and Prepare the Pan: Preheat your oven to 350°F (175°C). Generously grease a 9-inch round springform pan with butter or shortening to ensure easy release after baking.
- Prepare the Red Velvet Brownie Batter: Fill a small pot halfway with water and bring to a gentle boil. In a bowl, whisk together the flour, baking powder, and salt. In a heatproof bowl, melt the butter and chocolate over the simmering water until smooth and shiny, stirring occasionally. Remove from heat and let cool slightly. Whisk in the brown sugar, then add eggs and red food coloring. Finally, fold in the dry ingredients, mixing until smooth. Set aside.
- Prepare the Cheesecake Batter: Using a stand mixer with paddle attachment, beat cream cheese and Greek yogurt until smooth and fluffy. Add granulated sugar and vanilla extract, mixing well. Add eggs one at a time, fully incorporating each before adding the next. Mix in flour until batter is fully combined and smooth. Set aside.
- Assemble the Cheesecake Brownies: Reserve ¼ cup of the brownie batter. Pour the remaining brownie batter into the prepared pan and smooth into an even layer. Pour cheesecake batter over the brownie layer. Drizzle reserved brownie batter on top. Use a butter knife to swirl the top layers for a marbled effect.
- Bake and Cool the Cheesecake Brownies: Bake for about 30 minutes until cheesecake is set and edges turn golden. Remove from oven, let cool for 30 minutes, then release the springform pan. Sprinkle with red sugar crystals. Cover with a dome and refrigerate for at least 3 hours or overnight to set completely.
- Cut and Serve the Heart-Shaped Brownies: After chilling, use a 2-3 inch heart-shaped cookie cutter dipped in hot water (and dried) to cut out heart shapes from the slab. Aim for about 20 pieces while using scraps as a treat. Serve immediately or store in a single layer in the refrigerator for up to 2 days to maintain swirl integrity.
Notes
- Ensure cream cheese is at room temperature for smooth mixing and to avoid lumps.
- Use full-fat Greek yogurt for creaminess in the cheesecake batter.
- Swirling the reserved brownie batter creates an attractive marbled look; avoid over-mixing to keep the design distinct.
- Refrigerate the brownies before cutting to achieve clean heart shapes.
- Store brownies in a single layer in the fridge to maintain the marbled texture and freshness.


Leave a Reply