If you're on the lookout for a breakfast that's not only delicious but also packs a punch of nutrition, this High Protein Pancake Recipe is exactly what you need. Perfect for busy mornings or a slow weekend brunch, these pancakes deliver a satisfying, fluffy texture while fueling your day with quality protein. I love making them when I want a hearty start that keeps me energized for hours.

Jump to:
Why This Recipe Works
This High Protein Pancake Recipe hits the sweet spot between nutrition and taste, making it a reliable go-to for mornings when you want energy without sacrificing flavor. The ingredients work harmoniously to give you pancakes that are tender yet substantial, so you feel full without heaviness.
- Consistent Texture: The blend of oats and cottage cheese creates a silky batter that cooks to soft, fluffy pancakes every time.
- Deep, Balanced Flavor: Cinnamon and vanilla add warmth and aroma, while the natural tang from cottage cheese adds subtle complexity.
- Simple Ingredients: With pantry basics and a scoop of your favorite protein powder, this recipe keeps things fuss-free and adaptable.
- Fast Prep, Big Payoff: Just a few minutes in the blender and a quick rest make it easy to whip up even on tight mornings.
Ingredient Game Plan

The secret to great pancakes often lies in quality ingredients and understanding their roles. For this High Protein Pancake Recipe, I prioritize whole-food sources and ensure my protein powder complements the rest of the flavors for the best results.
- Rolled oats or oat flour: Using rolled oats adds natural fiber and a gentle nuttiness; if using oats, blend them to flour consistency for smooth batter.
- Cottage cheese or Greek yogurt: Both add creaminess and tang; choose plain, full-fat for richness and avoid flavored varieties to keep sweetness balanced.
- Protein powder: Whey works wonderfully for fluffiness, but plant-based options like pea or brown rice protein mix well too.
- Eggs: Bind and add moisture; farm-fresh eggs often yield better taste and texture.
- Baking powder: Just a hint helps the pancakes rise nicely without overpowering the texture.
- Cinnamon and vanilla extract: These lift the flavor, giving that cozy breakfast vibe - I always add them for warmth.
- Milk or water: Used sparingly to adjust batter consistency; a plant-based milk like almond or oat milk works great here.
- Coconut oil or ghee: For cooking, these add a subtle toasty aroma and crisp edges without sticking.
Quick Note: Exact measurements are in the printable recipe card at the bottom.
How to Cook High Protein Pancake Recipe
Step 1 - Prep & Season
Start by adding your oats, cottage cheese, eggs, protein powder, baking powder, cinnamon, vanilla, and a pinch of salt into a blender. Blend them until you get a smooth, creamy batter with no lumps-this usually takes about 30 seconds. When you scoop it out, it should be thick but pourable. This step ensures every pancake cooks evenly and has a tender crumb.
Step 2 - Build Flavor
After blending, let the batter rest for 5 to 10 minutes to thicken and let the oats fully absorb moisture. You'll notice the batter become silkier and easier to work with. If it feels too thick to pour easily, add a splash of milk or water and stir gently to loosen. This pause leaves room for flavors to marry and boosts your pancakes' texture.
Step 3 - Finish for Best Texture
Heat your non-stick skillet over medium-low heat and add a little coconut oil or ghee, melting until shimmering but not smoking. Pour the batter in ¼ cup portions. Cook for 2 to 3 minutes until bubbles appear on the surface and the edges start looking set and lightly golden. Flip carefully and cook an additional 1 to 2 minutes until the pancakes are golden brown and cooked through. Using medium-low heat prevents burning while allowing the inside to remain tender.
Pro Moves I Swear By
From my kitchen to yours, these tips help ensure your High Protein Pancake Recipe turns out reliably fluffy and flavorful, every time.
- Doneness Cue: Look for bubbles forming and edges setting before flipping; this signals the pancake is cooked underneath but still moist inside.
- Temperature Trick: Use medium-low heat to avoid burning, which is especially important for protein-rich batters that brown fast.
- Make-Ahead Move: You can make the batter the night before; let it rest covered in the fridge, then give it a gentle stir before cooking.
- Skip This Pitfall: Avoid overmixing the batter-once smooth, stop blending to keep pancakes tender rather than dense.
Serve It Up

Finishing Touches
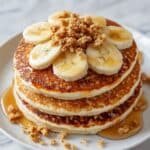
I like topping these high protein pancakes with Greek yogurt for extra creaminess, a drizzle of natural nut butter for richness, and fresh berries to add juiciness and color. These add-ons enhance nutritional value while layering complimentary textures and flavors, giving you a breakfast that feels both indulgent and nourishing.
Great Pairings
For a balanced meal, I often serve these pancakes alongside a side of scrambled eggs or sautéed greens. The savory contrast pairs beautifully with the lightly sweet pancakes and helps keep you full well into the afternoon. A small handful of nuts or seeds sprinkled on top adds a welcome crunch too.
Easy Plating Wins
Stack your pancakes tall, spreading a thin layer of nut butter between each for a quick layering effect. Garnish with fresh berries and a sprinkle of cinnamon or chia seeds. A small drizzle of honey or maple syrup adds just a touch of sweetness without overwhelming the protein-packed base. It's simple but always impressive, whether it's a casual weekday breakfast or a special brunch.
Make-Ahead & Storage
Storing Leftovers
Store any leftover pancakes in an airtight container in the refrigerator for up to 3 days. I recommend layering parchment paper between each pancake so they don't stick together. You'll notice they maintain their soft texture well but may lose that fresh-from-the-griddle crispness, which we can easily refresh when reheating.
Freezer Notes
This High Protein Pancake Recipe freezes beautifully. Just freeze pancakes flat on a baking sheet and transfer to a freezer bag once solid. They keep well for up to 2 months. When you want some, you can thaw them gently or reheat straight from frozen without any noticeable loss in flavor or texture.
Reheating High Protein Pancake Recipe Without Drying Out
To revive your pancakes, reheat them in a toaster oven or air fryer at 350°F (175°C) for 3 to 5 minutes to regain crisp edges without drying the inside. Microwaving works in a pinch-cover with a damp paper towel to trap moisture and heat in short intervals. This way, your pancakes stay tender and delicious, just like fresh.
Frequently Asked Questions
Yes! Whey protein is my go-to for a fluffy texture, but plant-based powders like pea or brown rice protein work well too. Just make sure to choose unflavored or mildly flavored protein to maintain balanced taste.
You can substitute with plain yogurt or even mashed banana for moisture, but keep in mind the flavor and protein content may shift slightly. Cottage cheese adds great creaminess and protein boost that's hard to replace perfectly.
It should be thick enough to hold its shape on the pan but still pourable. Letting the batter rest helps thicken it naturally; if it's too thick, a splash of milk or water will loosen it up just right.
With some tweaks, yes! Use plant-based protein powder, swap eggs for flax or chia "eggs," and use dairy-free yogurt or silken tofu. However, the texture will differ slightly from the original version.
Final Thoughts
Making this High Protein Pancake Recipe has become one of my favorite weekday morning rituals. It's simple, satisfying, and designed to keep you fueled without weighing you down. Once you get the hang of the batter consistency and cooking temperature, I promise you'll have a breakfast you look forward to - fluffy, flavorful, and packed with good-for-you protein. Give it a try, and enjoy the process as much as the results.
PrintComplete Recipe
High Protein Pancake Recipe
A delicious high protein pancake recipe that combines oats, cottage cheese, eggs, and protein powder to create fluffy and nutritious pancakes perfect for a filling breakfast or post-workout meal.
- Prep Time: 10 minutes
- Cook Time: 10 minutes
- Total Time: 20 minutes
- Yield: 4 servings
- Category: Breakfast
- Method: Stovetop
- Cuisine: American
- Diet: Low Lactose
Ingredients
Main Ingredients
- ½ cup rolled oats (or oat flour)
- ½ cup cottage cheese or Greek yogurt
- 2 eggs
- 1 scoop protein powder (whey or plant-based)
- ¼ teaspoon baking powder
- ¼ teaspoon cinnamon (optional)
- 1 teaspoon vanilla extract
- 2 tablespoon milk or water (to thin batter as needed)
- Pinch of salt
- Coconut oil or ghee for cooking
Instructions
- Blend ingredients: Add oats, cottage cheese, eggs, protein powder, baking powder, cinnamon, vanilla extract, and salt to a blender. Blend until the batter is smooth and well combined.
- Rest the batter: Let the batter rest for 5 to 10 minutes to thicken slightly. If the batter becomes too thick, add a small splash of milk or water to adjust the consistency.
- Preheat skillet: Heat a non-stick skillet over medium-low heat and add a small amount of coconut oil or ghee to prevent sticking.
- Cook pancakes: Pour ¼ cup portions of the batter into the skillet. Cook for 2 to 3 minutes until bubbles form on the surface and the edges look set.
- Flip pancakes: Carefully flip the pancakes and cook for another 1 to 2 minutes until golden brown and cooked through.
- Repeat cooking: Continue cooking the remaining batter in the same manner.
- Serve: Serve the pancakes warm with your favorite toppings such as Greek yogurt, nut butter, berries, or protein frosting.
Notes
- You can substitute rolled oats with oat flour for a smoother texture.
- If you prefer vegan protein, choose a plant-based protein powder for this recipe.
- Use coconut oil or ghee for a subtle flavor and non-stick cooking.
- Resting the batter improves the pancake texture by allowing oats to absorb liquid.
- Make sure your skillet is not too hot to prevent burning before the inside cooks through.
- Optional cinnamon adds a warm, spicy note perfect for breakfast pancakes.


Leave a Reply