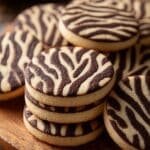
If you're craving a fun and visually striking treat, this Zebra Cookies Recipe is just the thing. Designed to showcase alternating stripes of vanilla and chocolate dough, these cookies are as delightful to look at as they are to eat. Whether you're baking with kids or prepping for a cozy afternoon tea, making these cookies turns an ordinary baking session into a joyful experience.

Jump to:
Why This Recipe Works
This Zebra Cookies Recipe blends classic flavors with a playful design that's surprisingly simple to achieve at home. The soft, buttery dough contrasts beautifully with the rich cocoa portion, creating a perfect harmony of taste and texture. It's a recipe where the look is just as satisfying as the flavor, making it a hit at any gathering or just for a treat to brighten your day.
- Consistent Texture: The dough is balanced to stay soft without spreading too much, keeping crisp edges and tender centers.
- Deep, Balanced Flavor: Cocoa powder adds just the right chocolate punch without overpowering the buttery vanilla dough.
- Simple Ingredients: Pantry staples come together easily, so you don't need fancy extras to impress.
- Fast Prep, Big Payoff: Minimal rolling and slicing streamline the process for quick, beautiful results.
Ingredient Game Plan

For this Zebra Cookies Recipe, I always prioritize fresh butter and good-quality cocoa powder since they really shine through in taste. You'll find the dough easy to handle when ingredients are at room temperature and measurements are precise.
- All-purpose flour: Use a spoon-and-level method for measuring to avoid a dense dough.
- Unsalted butter: Softened but not melted, so it cream well for fluffiness.
- Cocoa powder: Natural unsweetened cocoa provides vibrant flavor and color.
- Granulated sugar: For that classic sweet crunch and tenderness.
- Egg and vanilla extract: For binding, moisture, and warm aromatic notes.
- Milk: Just a splash to soften the cocoa dough without making it sticky.
Quick Note: Exact measurements are in the printable recipe card at the bottom.
How to Cook Zebra Cookies Recipe
Step 1 - Prep & Season
Start by preheating your oven to 350°F (175°C) and lining a baking sheet with parchment paper to keep the cookies from sticking. Whisk together the flour, baking powder, and salt in a medium bowl-this dry mix will give the cookies light rise and a little structure. I like to stir these thoroughly so the leavening is evenly distributed for consistent results.
Step 2 - Build Flavor
In a large bowl, beat the softened butter and sugar until the mixture becomes pale and fluffy. This step is key-it traps air in the dough, which makes those cookies wonderfully tender. Then, add the egg and vanilla extract, mixing until you see a smooth, slightly glossy batter. Next, fold in the dry ingredients gradually just until a dough forms. Split the dough in half, stirring cocoa powder and milk into one half until the chocolate color is rich and even. This dual dough is the heart of your zebra pattern.
Step 3 - Finish for Best Texture
Roll each dough portion into small balls about an inch wide. Then gently roll a vanilla and chocolate dough ball together to create a "log" with the distinctive zebra stripes. Slice the logs into ¼-inch thick rounds and arrange them spaced on your prepared sheet. Baking for 10 to 12 minutes, keep an eye out for the edges turning just golden-that's your cue they're done but still soft inside. Let them cool for 5 minutes on the sheet first; this resting time helps keep them from breaking while still warm.
Pro Moves I Swear By
I've made this Zebra Cookies Recipe many times, and here's what I've learned to make it foolproof and gorgeous every time. Pay attention to dough softness, slicing thickness, and baking cues for a flawless finish.
- Doneness Cue: Look for lightly golden edges but still pale cookie centers to avoid drying out.
- Temperature Trick: Using room-temperature butter ensures the dough is easy to work with and blends uniformly.
- Make-Ahead Move: Chill your dough logs for 30 minutes before slicing to make cleaner stripes and neater cookies.
- Skip This Pitfall: Don't overmix once you add cocoa powder; too much stirring can make dough tough.
Serve It Up

Finishing Touches
I love serving these zebra cookies just as they are-their striking pattern is a natural conversation starter. But if you want to elevate them, a light dusting of powdered sugar or a drizzle of melted white chocolate pairs beautifully to add a subtle sweetness and shine. The smooth vanilla and cocoa flavors stand up well to a simple finishing flourish.
Great Pairings
You'll enjoy these cookies alongside a cup of rich espresso or a glass of cold milk-both bring out their sweet, buttery notes. For gatherings, I often suggest fresh berries or a mild cheese plate to complement the soft, delicate texture with some fresh, tart contrast.
Easy Plating Wins
For a casual snack, stack a few zebra cookies on a rustic wooden board or a vintage plate-simple and inviting. For something more special, serve them in neat rows on a white platter to really highlight the stripes. I find a sprig of fresh mint or a few edible flowers helps turn this humble cookie into a showstopper.
Make-Ahead & Storage
Storing Leftovers
Keep your leftover zebra cookies in an airtight container at room temperature for up to 5 days. Using a container with a tight seal helps maintain that tender-but-crisp texture. If you want to be sure they stay fresh, layering parchment paper between the cookies prevents sticking and keeps the stripes intact.
Freezer Notes
This Zebra Cookies Recipe freezes very well. After baking and cooling completely, place cookies in a freezer-safe container or bag with parchment layers in between. They keep for up to 3 months. When you're ready to indulge, just thaw at room temperature for about 30 minutes for the best texture.
Reheating Zebra Cookies Recipe Without Drying Out
If you want to enjoy warm cookies without drying them out, heat in the oven at 300°F for 5-7 minutes. For a quicker fix, microwave a cookie for 10-15 seconds on a microwave-safe plate, but do so cautiously to avoid rubbery results. Slightly wrapping them in a damp paper towel can help keep them moist.
Frequently Asked Questions
All-purpose flour works best for the right texture and structure, but you can experiment with half whole wheat for a nuttier flavor. Just expect a slightly denser cookie.
Chilling the dough logs before slicing helps maintain clean, sharp stripes. Also, rolling dough balls gently without over-mixing prevents color blending.
Yes! Substitute all-purpose flour with a cup-for-cup gluten-free blend, but check for added xanthan gum or other binders needed for texture.
Absolutely! The rolling and slicing steps are fun for little hands, making it a perfect baking project with kids under supervision.
Final Thoughts
PrintComplete Recipe
Zebra Cookies Recipe
Delight in the whimsical charm of Zebra Cookies, featuring an irresistible marbled design created by alternating vanilla and chocolate dough. These tender, buttery cookies offer a perfect balance of rich cocoa and sweet vanilla flavors, making them a fun and tasty treat for any occasion.
- Prep Time: 20 minutes
- Cook Time: 12 minutes
- Total Time: 32 minutes
- Yield: 24 cookies
- Category: Dessert
- Method: Baking
- Cuisine: American
- Diet: Vegetarian
Ingredients
Dry Ingredients
- 1 ½ cups all-purpose flour
- ½ teaspoon baking powder
- ¼ teaspoon salt
Wet Ingredients
- ½ cup unsalted butter, softened
- 1 cup granulated sugar
- 1 large egg
- 1 teaspoon vanilla extract
- 2 tablespoons milk
Chocolate Dough
- ½ cup cocoa powder
Instructions
- Preheat Oven: Preheat your oven to 350°F (175°C) and line a baking sheet with parchment paper for easy cookie removal and cleanup.
- Mix Dry Ingredients: In a medium bowl, whisk together the all-purpose flour, baking powder, and salt, ensuring they are well combined for even distribution.
- Cream Butter and Sugar: In a large bowl, beat the softened unsalted butter and granulated sugar together until the mixture becomes light, fluffy, and smooth, which will yield tender cookies.
- Add Egg and Vanilla: Incorporate the egg and vanilla extract into the creamed mixture, mixing until fully combined and smooth.
- Combine Dry and Wet: Gradually add the dry ingredient mixture to the wet ingredients, stirring gently until the dough forms a cohesive mass without overmixing to prevent toughness.
- Divide Dough: Split the dough evenly into two portions, preparing one for vanilla and the other for chocolate flavoring.
- Create Chocolate Dough: To one portion, add the cocoa powder and milk, mixing thoroughly until the cocoa is fully incorporated, resulting in a smooth chocolate dough.
- Form Dough Balls: Roll small balls of both vanilla and chocolate dough, approximately 1 inch in diameter, ensuring uniform size for even baking.
- Make Zebra Logs: Roll together one ball of vanilla dough and one ball of chocolate dough to form a striped "log" shape, creating the signature zebra pattern.
- Slice and Bake: Slice the dough logs into ¼-inch thick rounds and arrange them on the prepared baking sheet, spacing them slightly apart. Bake in the preheated oven for 12 minutes or until edges turn lightly golden.
- Cool Cookies: Allow the cookies to rest on the baking sheet for 5 minutes after baking, then transfer them to a wire rack to cool completely, which helps maintain their shape and texture.
Notes
- Use room temperature butter for easier creaming and better texture.
- For a dairy-free option, substitute milk with almond or oat milk and use vegan butter.
- Chilling the dough logs in the refrigerator for 15-20 minutes before slicing can help achieve cleaner zebra stripes.
- If you like, dust the cookies with powdered sugar before serving for extra sweetness and presentation.
- Store cookies in an airtight container at room temperature for up to one week to maintain freshness.


Leave a Reply