Bright, tangy, and creamy, this Lemon Marbled Cheesecake Bars That Brighten Your Day Recipe is one of those desserts that feels like a little celebration with every bite. I like to make these bars when I want to add a burst of sunshine to a quiet afternoon or impress friends without fuss. You'll notice how the fresh lemon swirls give these bars a vibrant look, while the silky cheesecake filling is a dream to slice and serve.

Jump to:
Why This Recipe Works
This Lemon Marbled Cheesecake Bars That Brighten Your Day Recipe balances creamy richness with bright citrus notes, creating a perfect harmony of flavor and texture. The marbling isn't just pretty-it allows the lemon to shine without overpowering the smooth cheesecake base.
- Consistent Texture: The crust gets delightfully crisp, and the filling stays creamy and velvety every time without cracking.
- Deep, Balanced Flavor: Fresh lemon zest and juice brighten the bars naturally, while just the right sugar amount keeps it sweet but refreshing.
- Simple Ingredients: No complicated elements here-just pantry basics and fresh lemon for a recipe anyone can tackle.
- Fast Prep, Big Payoff: A straightforward process with minimal fuss that rewards you with a beautiful, crowd-pleasing dessert.
Ingredient Game Plan

Picking the right ingredients sets you up for success with these Lemon Marbled Cheesecake Bars That Brighten Your Day Recipe. I always reach for full-fat cream cheese for smoothness and fresh lemons to get that lively citrus punch.
- Cream Cheese: Use room temperature for easier mixing and a silky finish.
- Graham Crackers or Almond Flour: Graham crackers give a classic crunch; almond flour is a great gluten-free alternative.
- Lemons: Fresh zest and juice make all the difference-avoid bottled lemon juice if you can.
- Butter: Melted unsalted butter binds the crust perfectly without overpowering flavors.
Quick Note: Exact measurements are in the printable recipe card at the bottom.
How to Cook Lemon Marbled Cheesecake Bars That Brighten Your Day Recipe
Step 1 - Prep & Season
Start by preheating your oven to 325°F (160°C). Lining your 8x8-inch baking pan with parchment paper makes it so easy to lift the bars out later without any mess. For the crust, combine your crushed graham crackers with melted butter until everything looks evenly moistened. Press the mixture firmly and evenly into the bottom of the pan-this helps you get those golden edges I love-and bake it for 10 minutes. You'll smell that toasty aroma developing, which always feels like cooking magic.
Step 2 - Build Flavor
Beat the cream cheese until it's super smooth-no lumps here! Gradually add sugar, then eggs one at a time to keep the texture silky. A splash of vanilla extract and freshly grated lemon zest add layers of subtle flavor that you'll appreciate in every bite. Reserve half of this batter in a separate bowl, and stir the fresh lemon juice and a few drops of yellow food coloring (if desired) into the other half. Pour the plain batter over your pre-baked crust, then dollop the lemon batter on top. Use a butter knife or skewer to swirl gently, creating that signature marbled look-don't overmix to keep the contrast crisp and pretty.
Step 3 - Finish for Best Texture
Bake for about 30 to 35 minutes until you see the edges set with a slight jiggle in the center-think of it like a soft wobble, not liquid. This means the cheesecake will finish setting perfectly as it cools. After baking, I like to leave the bars in the oven with the door slightly open for an hour; this gentle cooling helps reduce cracks. Once cooled, pop them into the fridge for at least 4 hours to chill and firm up completely, which makes slicing them so much cleaner.
Pro Moves I Swear By
After making this Lemon Marbled Cheesecake Bars That Brighten Your Day Recipe a few times, I've learned some tweaks that help every batch turn out beautifully. It's all about gentle handling and timing.
- Doneness Cue: Watch for a lightly golden edge and a slightly wobbly center rather than a firm set.
- Temperature Trick: Bring cream cheese and eggs to room temperature before mixing to avoid lumps and cracks.
- Make-Ahead Move: These bars improve after chilling overnight, making them perfect for prepping a day ahead.
- Skip This Pitfall: Don't over-swirl the lemon batter or you'll lose the pretty marbled pattern.
Serve It Up

Finishing Touches
When serving, I like to add a scattering of fresh berries right on top or alongside-strawberries, blueberries, or raspberries all work brilliantly. Their contrasting colors and slight tartness elevate the dessert without competing with the lemon notes. A light dusting of powdered sugar adds a delicate, elegant finish that catches the light beautifully on the marbled surface.
Great Pairings
This dessert pairs wonderfully with a cup of herbal tea or a bright white wine if you're serving adults. I also love it with whipped cream on the side for extra indulgence and some toasted nuts if you want a crunch contrast. These bars are versatile, so feel free to get creative!
Easy Plating Wins
If you're plating for a casual occasion, just lining up squares on a simple platter does the trick-the marbled tops are already beautiful enough. For more special moments, drizzle a little lemon glaze or serve with a dollop of homemade whipped cream and extra berries. Little mint leaves on top add a fresh pop of color and aroma that guests always comment on.
Make-Ahead & Storage
Storing Leftovers
Store any leftover Lemon Marbled Cheesecake Bars That Brighten Your Day Recipe in an airtight container in the fridge. They'll keep beautifully for up to 5 days, maintaining their creamy texture and bright flavor. Keep the bars chilled until just before serving to enjoy their perfect firmness.
Freezer Notes
These cheesecake bars freeze very well if you want to prep ahead or save extras. Wrap individual squares tightly in plastic wrap and place them in a freezer-safe bag. They'll keep up to 2 months. Thaw in the fridge overnight for best texture and taste. I've found that freezing doesn't dull the lemon flavor at all, which is a nice bonus.
Reheating Lemon Marbled Cheesecake Bars That Brighten Your Day Recipe Without Drying Out
If you want to enjoy these bars warm, I recommend reheating gently in a low oven at 300°F (150°C) for 10 minutes, covering loosely with foil to keep moisture in. Alternatively, short bursts in the microwave (about 15 seconds) work but be careful not to overheat and dry them out. Keeping a small dish of water nearby during warming in a microwave can help maintain moisture.
Frequently Asked Questions
Absolutely! Almond flour works wonderfully for a gluten-free option and adds a subtle nuttiness that pairs beautifully with the lemon. Just make sure to pack the crust firmly before baking.
Cracking often happens if the oven temperature is too high or the cheesecake is overbaked. Using room temperature ingredients, baking at 325°F, and allowing the cheesecake to cool slowly in the oven with the door ajar can prevent cracks.
Yes, you can reduce the sugar slightly, but keep in mind this will affect the sweetness balance. The fresh lemon juice adds natural tartness, so taste your batter before baking to adjust.
Pour the plain cheesecake batter over the crust first, then add spoonfuls of lemon batter on top. Swirl gently with a skewer or butter knife-don't overmix or the colors will blend too much.
Final Thoughts
PrintComplete Recipe
Lemon Marbled Cheesecake Bars That Brighten Your Day Recipe
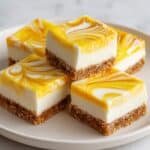
Lemon Marbled Cheesecake Bars are a bright and tangy dessert featuring a buttery graham cracker crust, smooth cheesecake filling with fresh lemon zest and juice, and a beautiful marbled lemon swirl. Topped with fresh berries, these bars are perfect for spring and summer gatherings that delight the senses with a refreshing citrus flavor and creamy texture.
- Prep Time: 30 minutes
- Cook Time: 35 minutes
- Total Time: 5 hours 5 minutes
- Yield: 16 bars
- Category: Dessert
- Method: Baking
- Cuisine: American
- Diet: Gluten Free
Ingredients
For the Crust
- 1 cup Graham Crackers or almond flour for gluten-free
- ½ cup Butter melted
For the Cheesecake Filling
- 16 oz Cream Cheese room temperature
- ¾ cup Granulated Sugar reduce for lower sugar
- 3 Eggs
- 1 teaspoon Vanilla Extract preferably pure
- 1 tablespoon Lemon Zest fresh
- ¼ cup Lemon Juice fresh
- few drops Yellow Food Coloring optional
For the Decoration
- 1 cup Fresh Berries for serving
Instructions
- Preheat Oven and Prepare Pan: Preheat your oven to 325°F (160°C) and line an 8x8-inch baking pan with parchment paper for easy removal and clean-up.
- Make the Crust: In a medium bowl, combine the crushed graham crackers (or almond flour for gluten-free) with the melted butter. Press this mixture firmly into the bottom of the prepared baking pan to form an even crust. Bake the crust for 10 minutes to set.
- Prepare Cheesecake Batter: In a large bowl, use an electric mixer to beat the cream cheese until completely smooth and creamy. Gradually add the granulated sugar, beating well after each addition. Then add the eggs one at a time, mixing thoroughly after each. Stir in the vanilla extract and fresh lemon zest for bright flavor.
- Create Lemon Swirl: Reserve half of the cheesecake batter in a separate bowl. To the remaining half, mix in the fresh lemon juice and a few drops of yellow food coloring if using, to enhance the lemon marbling effect.
- Assemble the Bars: Pour the plain cheesecake batter over the baked crust, spreading it evenly. Dollop the lemon batter on top and use a skewer or knife to swirl the two batters together gently, creating a marbled pattern.
- Bake the Cheesecake Bars: Place the pan in the oven and bake for 35 minutes. The edges should be set while the center remains slightly jiggly for the perfect texture.
- Cool and Chill: After baking, turn the oven off and leave the door slightly open to let the bars cool in the oven for 1 hour. Then transfer the bars to the refrigerator and chill for at least 4 hours to firm up completely.
- Serve: Once chilled, remove from the pan using the parchment paper, cut into bars, and garnish with fresh berries before serving for a fresh, vibrant finish.
Notes
- Use almond flour instead of graham crackers to make these bars gluten-free.
- Reduce sugar slightly if you prefer a less sweet dessert.
- Allow the cream cheese to come to room temperature for a smoother batter and better texture.
- Swirling the batter gently ensures a pretty marbled pattern without overmixing.
- Chill the bars thoroughly to achieve clean slices and the ideal creamy consistency.
- If you don't have yellow food coloring, the lemon juice alone will still provide great flavor and a subtle color.
- Fresh berries complement the tart lemon flavor and add a colorful garnish.


Leave a Reply